by via The Daily Sudoku

This is a game that started off as just a round puzzle. I then had to make a box for it. The box then evolved into a fancier box with the feet added. I didn’t like the way it looked after the feet were added so I added the Peg game after I found the pattern in one of the wood magazines. I then decided I needed a place to put peg and made the box for them. The lids on the boxes are held on with magnets. I needed something for the other side and decided to make it Tic Tac Toe. Well I needed another box for those pieces to. After that the whole box was filled up and no more games could be added. The two lids are held together with magnets as well. This again started out as just a puzzle for a coworker’s mother. Well it never made it to her because my coworker liked it so much he kept it. The good news is his mother never knew this was even being made. It was fun to come up with this and I may make another for myself. Thanks for looking and enjoy.
This is a game that started off as just a round puzzle. I then had to make a box for it. The box then evolved into a fancier box with the feet added. I didn’t like the way it looked after the feet were added so I added the Peg game after I found the pattern in one of the wood magazines. I then decided I needed a place to put peg and made the box for them. The lids on the boxes are held on with magnets. I needed something for the other side and decided to make it Tic Tac Toe. Well I needed another box for those pieces to. After that the whole box was filled up and no more games could be added. The two lids are held together with magnets as well. This again started out as just a puzzle for a coworker’s mother. Well it never made it to her because my coworker liked it so much he kept it. The good news is his mother never knew this was even being made. It was fun to come up with this and I may make another for myself. Thanks for looking and enjoy.
Well friends, it has been one cold temperature spell the last few weeks here in my shop as you may have realized from past blogs. I finally got a chance to tend back to my main project, something new to me as I have never created a seat of any kind before.
I have found the process a lot to learn regarding proper pitch/splay when boring in the legs. It is really nothing all that complicated all the while nothing to get careless with either.
Soon the time approached for me to address my ideas to the springpole lathe and it had been quite a while since my last dance. I will not shy from the fact that I was a bit concerned and excited about turning a leg design, concerned for the now rusty greenhorn skill set I had built up a while ago but the excited feelings were there for the love of getting the lathe to make a proper song while turning the shavings loose to the ground!
So with some sketches I realized after some practice work to literally learn through the turn! These are my first official leg turnings and for the small amount of time I have been turning I was pretty satisfied with the output. Like anything you have to get at least 50 of these in your regimen before you feel like you can crank these out with accelerated ease.
The pieces of this puzzle are short in number although I was amazed at how much the craftwork contains attention to the overall piece. Lots of additional care will be used from shaving, sanding, shaping and fitting to attach this work. So far I have been able to greet each piece with the ability to learn and soak up this first attempt for further education in making things to sit on. It is extremely easy to become forgetful that any one thing we build takes a repeated exercise to attain an extended skill set for the desired work to be properly crafted. This very vital lesson was exposed to me through the meditation of consistently carving swedish spoons. Without that stage to learn on I would have had no solid reminder that any one thing we create most likely takes a a dozen at best before our whole instincts agree the job is crafted to the proper level of attaining one step of it’s understanding, performance and output.
I love the fact that for me this project although masked as an easy do it your selfer is nothing of the kind. I wanted challenges, the legs must have turnings, the seat will receive hand work of shaves, sanding and pride. I cannot stand thinking of such a piece as people dressed in commercial smocks with corporate pins high fiving that it will be done in 2 hours as it roars out stuck together by the sounds of factory. I would rather see some imperfections and embrace their charm without too much inner self doubt and know that every one of them I target as no more than an invitation to learn more of the dying craft! Once you have a love of the hand crafts you will find it extremely hard to ever find peace within expression through the faster and more accurate machine. You must be available to take those loses in trade for the commitment to the cause of traditional crafting. Also accept many others saying things like ”Your crazy, do it this way and your done already!”, lol. Oh what the hell high five then, lol!
Millers Falls brace and bit for boring the holes and the bevel gauge for setting the angle! Very important to feel for the bit lightly pushing through the other side then flip and drill. This way it will reduce the very willing problem of tearing out and messing things up more than needed.
Over to the old wood lathe, I had some closet pine dowels just about the diameter I could use and went to work on a layout for the leg.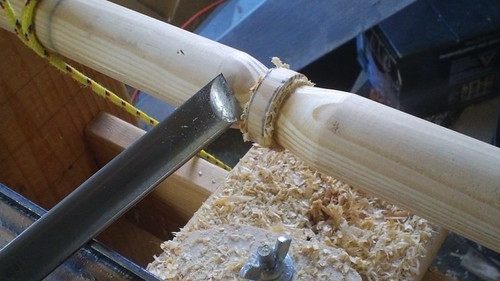
Patience and a lot of touch is required. Once the whole body is in motion the turning becomes easier.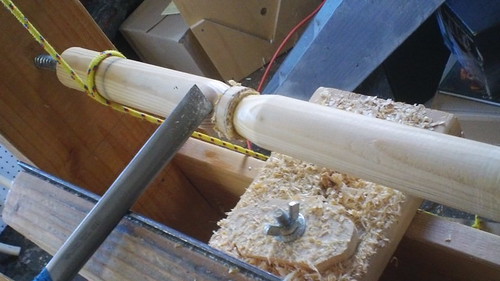
One of these is ready for some old style copy work. You make the first, if your happy with that then there is your template for the rest.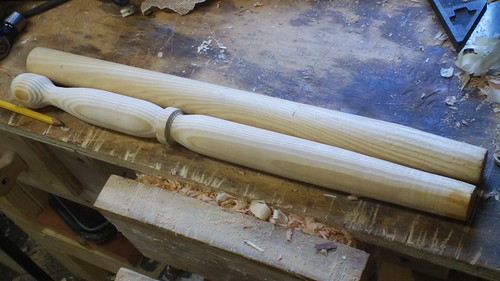
Getting some really nice shaves, I put the tools through some diamond stone sessions, stropped them up and they agreed to a sharp ready cut. With that said, my old pine dowel was not always grain friendly, lol.
With no room on the lathe I fixed my tool tray to my old school tool tote, lots of fun goodies in there! If you did not see, check it out! http://lumberjocks.com/projects/67345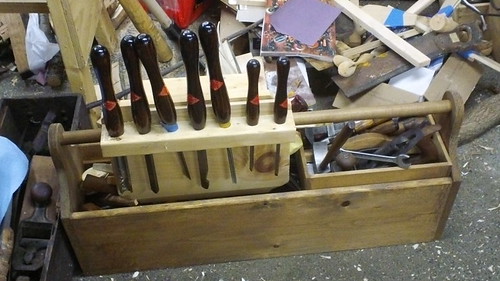
Performing things this way forces your instincts to make the piece with every bit of skill you have. If the skills are not where you like, keep turning, I know I have much more practice although the work is a real joy.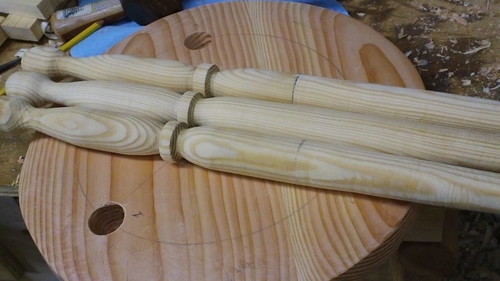
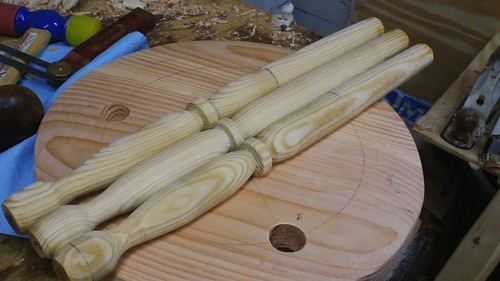
Lightly tapping in the legwork I can see what the rough of things looks like. I as all of is want to see every proportion from all angles.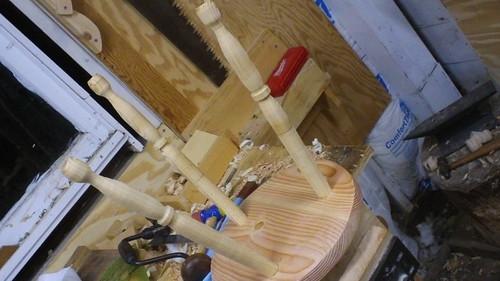
Ok, a rough version of the legs and top. They are not tapped or fitting through yet, this is literally a rough for composition. The legs will receive additional tapering, rounding and inspection. It feels really good to accomplish something new, my first legs!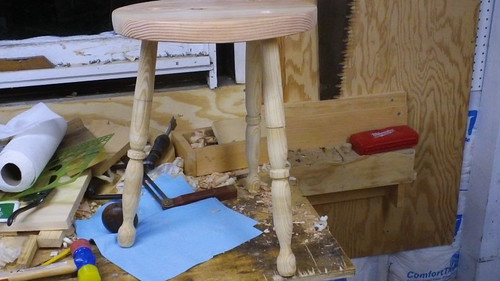
Well gang, lots more trouble to get into with this one, but I am happy with the process so far. Hoping for more human temperatures like 40 degrees or above, lol.
Thanks for taking a look, and stay safe in this ever changing weather!
Be well and enjoy your work!
Joe

I made this cribbage board for my wife for Christmas 2012 (actually finished before Christmas too!). I mostly followed this article that originally appeared in the December 2011 issue of Woodworker’s Journal magazine. I didn’t use any of the drilling templates suggested, but used this paper template that I temporarily spray glued to the surface. I think the scale of my printed template wasn’t quite right and put the 1/8” holes just slightly too close, so I ended up with some tear out between some of the holes—it doesn’t affect the ability to play the game though.
Woods used are curly maple, cherry, and walnut. The pegs are poplar dowels that I chucked up in a drill to shape with sandpaper and a chisel. The color of poplar varies enough that I was able to get the two colors naturally. The finish was a tung oil varnish.