by via The Daily Sudoku

My brother-in-law Brett is a huge Dodgers fan and has been collecting bobblehead figures given out at games he’s gone to over the past couple years. The bobbleheads had been sitting on top of a bookcase, and I figured they needed a proper home, so I made this shelf as a Christmas gift. I was going to just copy Marc Spagnuolo’s weekend wall shelf, but ended up making a few modifications. Rounded off the bottom and added the knob at the top to shape it like a bat. And inlaid the Dodgers logos in epoxy colored with metallic acrylic blue paint and blue glitter.
Woods are cherry and curly maple. Finish is a bunch of coats of shellac (super blond for maple and garnet for the cherry), sanded smooth, then a couple coats of gloss Arm-R-Seal, then Renaissance wax. I ended up with a very nice, smooth high-gloss finish.
My only regret is that the shelf is already full, and Brett’s already got his tickets for next seasons bobblehead games! To address this concern, he may institute a rotation where players who don’t perform or for other reasons are “in the dog house” don’t get a spot on the shelf. They’ll have to earn it!!
JoeyG has a great tutorial on epoxy inlay, which I found very helpful. I’ll give share a couple of my own observations on inlaying epoxy. Coloring it was very easy, and acrylic paint worked great as a colorant. Though I used a lot of glitter, not many sparkles came through. Seems like you only get sparkle from those glitter particles that end up sitting flat and flush with the sanded down surface. It was difficult to get a surface free of air bubbles with the epoxy. It’s typical to end up with a few air bubbles that need to be filled in. To minimize this, after pouring the colored epoxy into the ~1/8” deep recess (roughed out with the router with a 1/16” bit and touched up by hand), I heated the epoxy with a hair dryer to make it flow better and cause any air bubbles to raise to the surface. I think this heated it too much, as the epoxy cured hard really fast and rather rough, with lots of voids. I used System 3’s standard cure epoxy, but it was dry to the touch in just a few minutes after heating it. I filled in the voids with two more applications of thinned down colored epoxy, pressing it in nice and good, but still a few small voids remained. I quit there, as the voids really aren’t visible unless you’re studying it from a few inches away. (Like many of us I’m sure, I tend to obsess over imperfections that non-woodworkers probably won’t ever notice.)
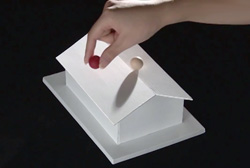
If you’re an old time fan of Mighty Optical Illusions blog you’re already familiar with all kinds of #impossible objects. We’ve featured hundreds of them over the course of seven years, however, after seeing creations of mathematician and professor Kokichi Sugihara, I will think before I use the word impossible going forward.
Sugihara’s award-winning creations often combine 2D-looking 3D structures with dynamic elements (rolling balls in this case) to toy with our perception of scale, dimension, and linear perspective. One I’m about to show you was presented few days ago at the European Conference on Visual Perception in Sardinia, Italy. For those of you who find this video familiar, you’re right – We already featured Sugihara’s creations in one of our earlier articles.
Sometimes the program turned these objects into real objects, and that’s how I discovered that some impossible objects are not really impossible. They can actually be built as solids in three-dimensional space.” – Sugihara